Knowing how to prepare walls for painting is the difference between a smooth, lasting finish and a patchy one that peels within months. Paint only looks as good as the surface beneath it. Professional decorators spend most of their time on preparation, not on the brush. This checklist shows you exactly what they do, so you can get the same result in your own home.
Why Wall Preparation Matters
Paint sticks best to clean, smooth and sound surfaces. Dust, grease and loose material stop it bonding. Cracks, dents and rough patches show through even the best paint. Good wall preparation before painting saves money too. Paint lasts longer, you need fewer coats and you avoid repainting sooner than expected. In short, preparation is the most important stage of any decorating job.
Tools and Materials You Need
Gather everything before you start. This keeps the job smooth and stops you leaving half-finished walls. A basic kit includes:
- Dust sheets and masking tape to protect floors, furniture and trim
- Sugar soap or a mild degreaser, with sponges and clean cloths
- A scraper and filling knife for loose paint and filler
- Ready-mixed filler for small holes and flexible filler for cracks
- Sanding blocks with medium and fine sandpaper
- Decorator’s caulk and a caulking gun for gaps
- Stain block and a suitable primer or mist coat
- A dust mask, safety glasses and a vacuum with a brush attachment
- A stepladder that is stable and the right height
Buy quality filler and primer. Cheap products often shrink, crack or fail to seal, which wastes the time you spent preparing.
How to Prepare Walls for Painting: Step by Step
Follow these stages in order. Each one builds on the last.
Clear the Room and Protect Surfaces
Move furniture out or push it to the centre and cover it. Lay dust sheets over floors, and use masking tape on skirting boards, window frames and switches. Switch off power before you remove socket covers. Good protection saves hours of cleaning later.
Inspect the Walls Closely
Walk around each wall with a good light. Look for cracks, holes, flaking paint, bubbling, stains and damp patches. Press suspicious spots with your thumb to check for softness. Note everything that needs repair. This inspection tells you what to fix, and in what order.
Clean the Walls Thoroughly
Dust, grease and smoke film stop paint sticking. Wipe walls with sugar soap or a mild degreaser mixed as directed. Pay extra attention to kitchens, hallways and areas near switches, where hands leave marks. Rinse with clean water and let the walls dry fully. A clean surface helps the paint grip and level evenly.
Remove Loose Paint and Old Wallpaper
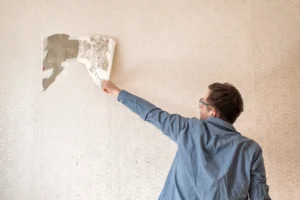
Scrape away flaking or blistered paint until you reach a firm edge. Strip old wallpaper completely, then wash off leftover paste, because it can cause new paint to bubble. Take care not to gouge the plaster. If the surface stays rough after scraping, you will sand it later.
Fill and Sand Walls Before Painting
This is the stage that shapes the final look. To fill and sand walls before painting, press filler firmly into each hole or crack, then smooth it level with the wall. Fill deep holes in layers and let each layer dry. Leave a slight raised edge, because filler shrinks as it dries.
Once dry, sand with medium paper, then finish with fine paper until the patch feels flush. Use a light and run your hand across the wall to check. Then vacuum or wipe away every trace of dust. Sanding dust left on the wall spoils the finish.
Seal Gaps with Caulk
Fill small gaps between walls and skirting boards, architraves and window frames using decorator’s caulk. Smooth the bead with a damp finger or tool. This gives sharp, tidy edges and stops draughts and dust from collecting. Let the caulk set before painting.
Treat Stains, Mould and Damp
Water marks, smoke stains and ink can bleed through new paint. Seal them with a stain-blocking primer. If you find mould, clean it with a suitable mould treatment and wear protection. Most importantly, find the cause. Painting over damp only hides the problem, and it returns. The government’s guidance on damp and mould explains the health risks and how to tackle the source.
Prime or Seal the Surface
Primer helps paint stick and gives an even colour. Use it on bare plaster, filled patches, stained areas and glossy walls. On new plaster, apply a thinned first coat, often called a mist coat, so the surface does not soak up your topcoat. Always follow the instructions on the tin.
Do a Final Check
Before you open the topcoat, view each wall in raking light, such as a torch held at a shallow angle. This shows every rough patch and missed fill. Fix any flaws now. Then check that masking tape is tight, floors are covered and the room is dust free.
Preparing Different Types of Wall
Not every wall needs the same approach. Match your method to the surface.
New plaster needs time to dry fully, then a mist coat before painting. Glossy or previously oil-painted walls need light sanding and a suitable primer, so new paint can grip. Wallpapered walls need complete paste removal and repairs to any torn plaster. Textured walls may need skimming if you want a smooth look.
Kitchens and bathrooms need extra cleaning to remove grease and humidity residue, and mould-resistant paint helps. In older London homes, be careful. Old layers of paint can contain lead, so avoid dry sanding and heavy scraping unless you know the paint is safe. Get advice from a professional if you are unsure. Breathable paints also suit old lime plaster, so check before you choose a product.
Common Wall Preparation Mistakes
Most paint failures start with rushed preparation. Avoid these frequent errors:
- Skipping the clean, so paint sits on grease and dust
- Painting over damp or mould without fixing the cause
- Leaving filler unsanded, so patches show through
- Applying filler too thickly in one go, which cracks as it dries
- Painting new plaster without a mist coat
- Working in poor light that hides flaws
- Rushing drying times between fills, primer and paint
Slow down and check each stage. A little patience at this point saves a repaint later.
How Long Does Wall Preparation Take?
Preparation often takes longer than painting. Small rooms in good condition need less time. Rooms with cracks, old wallpaper or damp take far more. Filler, caulk and primer all need drying time, so follow the instructions on each product. If you rush, the finish will show it. Plan for preparation to take up the bulk of your project, and the painting itself will go quickly.
DIY or Hire a Professional Decorator?
Many people can prepare a simple room themselves. But large repairs, high ceilings, stairwells, damp problems and tight deadlines are better left to a pro. A professional works faster, uses the right products and spots hidden faults early.
If you search for a painter and decorator near me, look for a team that includes proper preparation in the quote. Housing Solutions For You provides professional painting and decorating for London homes and rentals, with careful preparation, clean finishes and clear quotes. If preparation reveals damaged skirting or doors, our carpentry and joinery team can repair them first. If a stain points to a leak, our plumbing team can fix the source before painting. Our professional cleaning services can also leave the room spotless afterwards.
Wall Preparation for Rental Properties
Landlords have extra reasons to prepare walls well. Tenants leave scuffs, nail holes and marks. Neat filling and sanding between tenancies keeps the property looking fresh for viewings. Durable, washable paint over well-prepared walls also lasts longer and cuts repainting costs. Plan the work during the void period, so the home is ready quickly.
How to Choose a Painter and Decorator
A good decorator explains their preparation process. Ask these questions before you hire:
- Does your quote include cleaning, filling, sanding and priming?
- Can I see photos of recent work?
- Are you insured for work in clients’ homes?
- Which paint brands and finishes will you use?
- How long will the work take, and what is the payment schedule?
Trade bodies such as the Painting and Decorating Association promote standards across the industry. Choose a decorator who treats preparation as a priority, not an extra.
Safety Tips While Preparing Walls
Sanding and scraping create fine dust, so wear a dust mask and safety glasses. Open windows for ventilation and keep children and pets out of the room. Use a stable ladder and never overreach. The Health and Safety Executive offers guidance on construction dust and safe working. Clean up thoroughly once you finish, because dust lingers in corners and on frames.
Final Thoughts
Great paintwork starts long before the first coat. Clean the walls, repair every flaw, sand smooth and prime where needed. Take your time, and the result will look professional and last for years. Housing Solutions For You is ready to help if you want expert preparation and a flawless finish for your London home or rental. Prepare well, paint with confidence and enjoy walls that look their best.
“Call us today at +44 7984 122 111 and let’s chat, or visit us at London, UK.”